Pages

Sunday, December 11, 2011

A Christmas Star Wreath

Let me start off with apologizing for the photo quality. I am using my iPod touch, which doesn't have a very good camera in it, but at least it allows me to capture things on the fly.

My version of the Twig Star by Between U & Me

I had seen this sweet tutorial for a rustic star tree topper at Between U and Me and I just knew that I wanted to make something like that for the Crafters' Yankee Swap party that my friend Darlene is hosting this week.

Sweet rustic star tree topper by Between U and Me

I wanted it to be more of a wall hanging than a star for the tree. I didn't have any chicken wire so I looked for something else that was rustic that would serve as a good background for my version of the star. I found a red jute/burlap bag at the local Dollar Store yesterday and thought it would be perfect for my star.


My hubby and daughter went out for a walk with the puppy today and I tasked them to bring back the twigs I needed for this project. They brought back some perfectly sized alder branches, which we trimmed down to 5 inch lengths. I glued the pieces together and made a basic star shape.


I didn't have any twine so I had another plan for covering the glue seams. So I cut up the red burlap bag and glued it down to the back of my star, one point at a time. The nice thing about the bag is that it had a plasticky (is that a word) backing laminated to it, so it prevented the hot glue from seeping through and thus any nasty hot glue burns.

Once the fabric was in place, I cut up some artificial fir greenery and red berries that I scavenged from a wreath that I purchased at the Thrift Store yesterday. I glued the green tips and berries over the glue seams on the star. I used a bit of leftover wire from the berry bunched and created a hanging loop for the back. Then I created a little red bow from leftover burlap, which I glued to the top of the star.
 

So fuzzy pictures aside, what do you think of my version of the star. I like the simplicity of the original and I may just make one like that some day too, but I thought my version would be a nice decorative accent for a door or wall over the holidays. The best part is that I was able to use Dollar Store and thrifted and found materials so the cost on this was very low. I hope the recipient at the swap loves it.

Tuesday, December 6, 2011

Transformation Tuesday

Pepper here. I thought it would be a great idea to share some blog posts that have really wowed me. These bloggers worked their magic to transform these pieces from awful to amazing!

Take this old stereo cabinet. Honestly, wouldn't you be happy if somebody took it off your hands? My grandmother had one of these and she used to tune in the radio station from New Carlisle Quebec on it. I used to think that was so amazing since we were in New Brunswick. But I digress.

Becky at Doodle Bug saw beyond the dated finish and the speaker cloth on this one and transformed it into a beautiful and function piece of furniture that most people would be happy to have in their home now. See more about this transformation on her blog.


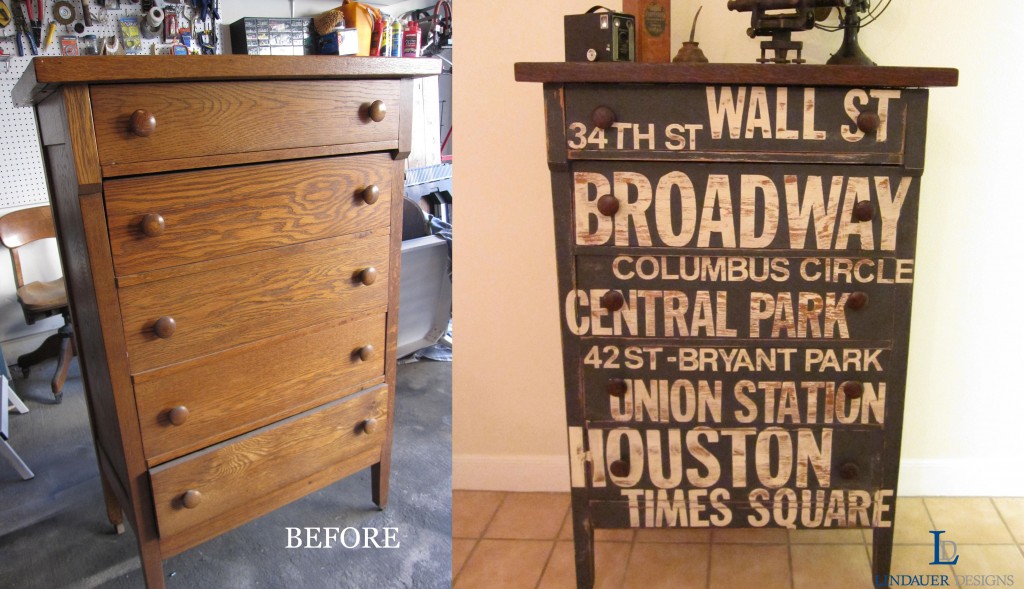
The moment I saw this Subway Art dresser at Lindauer Designs, it was love at first sight! How can you resist it? It's just so cool and retro and chippy perfection. I love how the wood grain can be see through the distressed white paint.


The varying sizes of the letters are great and so artfully placed. And lastly, even just the place names rock my world. Maybe I should try one with Saint John locations some day. It won't sound anywhere near as awesome as Times Square, Central Park and Union Station but hey, ya never know. Lancaster, Red Head, Kings Square, Glenn Falls... Would it work? Drop us a line and tell us what you think!

Finally, this Union Jack dresser from 4 The Love Of Wood, is just all kinds of fabulous. Even though I am a French speaking Acadian-Canadian, I can't help but love the look of this dresser. My ancestors though would likely not have appreciated the beauty in the design.


I love how the curved front makes the flag look like it's waving in the wind, and the ornate handles lend a certain regal air to the piece. I think something like this would sell in my lovely Loyalist city. What do you think? Love it or hate it? Let us know! I hope you enjoyed my picks for today.

I am on the last few coats of aqua spray paint on our heavy plaster frame and just started with a few coats of green paint on another frame. Things are looking good even though my socks are now permanently non-slip due to paint over spray on the basement floor.

~Pepper

Monday, December 5, 2011

And the work begins

I've started to spray paint the heavy plaster frame with Krylon Blue Ocean Breeze. It's such a pretty colour and I can't wait to see it all done. Stay tuned! Ms Salt has begun painting the other plaster frame with an ivory coloured paint. It's so much fun seeing our projects start to take shape!

After the first coat of paint

Friday, December 2, 2011

Seeing everything in a new light

Ms Salt here. Have you noticed that once you have been bitten by the refinishing bug you look at everything in a brand new light? I am now purposely checking all resources for nasty looking furniture that is beautiful on the inside. What would a coat of paint do to our trashy little dresser, or that sideboard we picked up for next to nothing? I can't wait to find out.

So what am I waiting for you say? The things standing in my way:
Work (the kind that pays the bills)
A kitchen renovation
Chauffeuring to and from hockey games
Events to attend (hockey again)
Dogs & kids always seem to need something

But Pepper and I will be getting together soon. In the meantime we are accumulating lots of great items to refinish. Take a look at the sweet chairs Pepper just scored.

6 Bass River Chairs in their original antiqued blue/gray finish
Photo courtesy of the chair's previous owner, via Kijiji


Well, shake ya later
Ms Salt